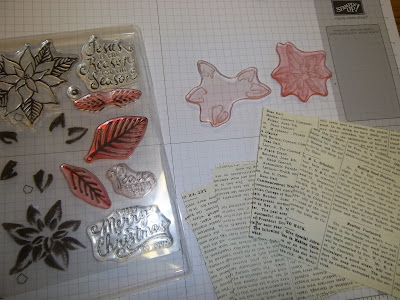
A sudden stroke of brilliance hit several weeks ago when I thought of the many many cards I hope to make for the holidays this year. I so badly wish I had friends close by to create with, but since I don't, I figured I could just pretend you all were here with me and we'd do a series of tutorials together. Ten cards of each style each time. I originally thought I would do a batch every week, but my life is simply full of too many variables for that. So we'll take it one post at a time.
Today we start with SU's Reason for the Season stamp set along with its coordinating Festive Flower Builder punch. Purchase these together and you save 15%! What's not to love about that?! And see what you can do with it??? This particular card is fairly time consuming, so it would really be fun to make together with several friends and maybe try it assembly line style. But I did it alone so it's definitely possible.
Alright, let's start by chopping a bunch of cardstock. You'll want 10 each of the following:
8 1/2" by 5 1/2" white cardstock (card base)
4 1/4" by 5 1/2" black cardstock (bottom layer)
4" by 5 1/2" Typeset Specialty DSP (aka Designer Series Paper)
With your brand new Festive Flower Builder Punch, punch out enough petals from red cardstock to make a total of 10 poinsettias. You will need:
40 large petals
40 medium petals
20 small connected petals
From yellow cardstock you will need to punch out 20 tiny crisscross pieces for the poin center.
Out of green cardstock, punch 30 large leaves.
You may notice I have different reds. I ran out of one color so just grabbed another. Also, this is a sort of a squareish poin. Some people have made gorgeous flowers using many more petals, but I figured if we wanted to save any time at all, maybe we should cut down the number of petals. Also, with more petals it wouldn't fit quite so well on this particular card.
Using Reason for the Season stamp set, stamp the veins into the petals and leaves using a darker shade of ink the same color as petals or leaves. Make sure to keep the points pointed up!
There they are! All stamped!

Score each petal and leaf. If you don't have scoring equipment, like me, improvise! I used my silicone pad, a clear block and a stylus. Worked like a charm!

Fold them all in half lengthwise.
To make each flower start by using the silicone pad and hot glue gun and gluing the tiny petals together in the center. NOTE: hot glue doesn't like extreme temps so if you're hoping to mail this and chances are it'll get really cold, you may want to use glue dots. It's gonna take a LOT of those! But you're card will arrive in great condition.
From underneath hot glue the medium sized petals onto the smaller ones.
Then add the largest petals...
...and three leaves.

Two of the teeny yellow crisscrossing pieces go in the center of the flower...
...and then a rhinestone.
Now pull in that typeset DSP and the stamps. I'm not using the outline of the poinsettia stamp since I want these blooms to be more in the background and not too detailed. Notice how stained my stamps are. That's perfectly ok and they work just as well this way if I clean them every time. I call them well-loved! We'll stamp those on our DSP in random places. I used Riding Hood Red and Cucumber Crush. SU now has those handy little arrows on the photopolymer stamps so it's easy to line up the 2-step stamps.
See? Ain't that perty?!
There's a teeny tiny little center stamp that I popped in the middle of these poins in yellow. In a way I think it's optional as both with and without look great.

Using Apothecary Accetns Dies I cut two labels, one from Timeless Elegance DSP and one from Vellum.
The sentiment "Peace be with you" fits nicely on the Vellum piece.
Assemble your cards, all 10 of them, using glue dots to adhere the poin on the left side of the stamped DSP as well as the left side of vellum label. It works well to use normal glue runner for the black label. Attach to card base and you're done!
Here's a close-up again. Nice, eh?
Here's a poin I made with "coredinations" paper from long ago.
WOW!!
Now I'm hoping to hear from some of you! I realize not everyone is as inclined to comment or write as I am, but sometimes I wonder if I'm doing this blog mostly for myself! Let me know if you're there!
Say Hi!


3 comments :
Shannon and I look every couple days to see if you've done anything new. Now this card is gorgeous but 10 of them?! WOW!
I get email notifications & I love it, I check when I get an email... I don't need to keep checking if there isn't a new post.
And your card is gorgeous & really like your tutorial!
Your cards are lovely - and you have inspired me to work on more Christmas cards. My Holiday Catalogue order is on it's way!!
Post a Comment